
This assignment, whilst possibly the most enjoyable, with the freedom to chose the subject, has also been one of my most challenging. I started this course with the objective of broadening my knowledge of photography and also to challenge myself in pursuing different genres of photography.
Overview
Some of the course exercises I have found more interesting than others. Understandable, as this is part of the natural course of learning and the minds ability to absorb information is better served when natural curiosity exists. An early exercise undertaken during the course (Exercise 1.12 Smash) required anticipation, the breaking of a piece of crockery, and capturing the point of impact, freezing the moment. At that time I felt I had not really afforded this exercise enough time and concentration to have a really successful outcome. Secondly, having exhausted all the old bits and pieces around the home I resorted to buying cheap crockery from the local supermarket. This I realised could also become an expensive exercise in broken crockery .
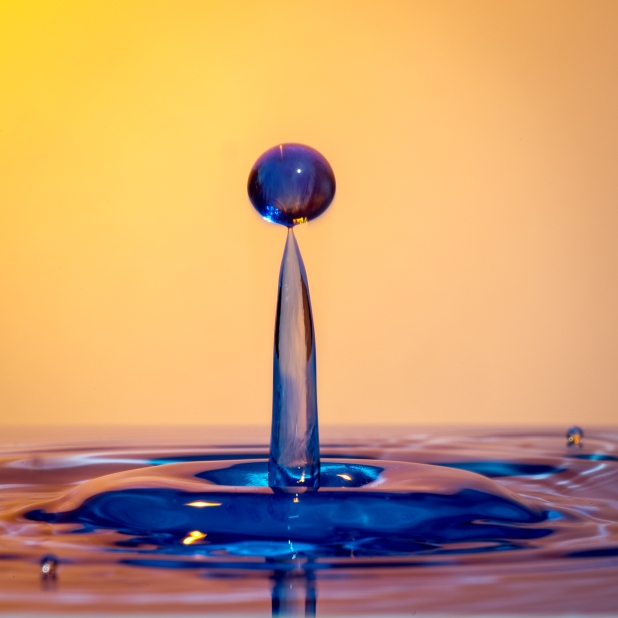
To produce successful pictures I really needed a better understanding and skill base of the subject than I felt I had at that time. Unlike landscape photography where we are as much dependent on the weather to make good pictures, those taken in a studio are under the complete control of the photographer. At the time I said I would like to revisit this and talking it over with the family I finally decided that my personal project would be “Water Sculptures”. I could explore this idea with the benefit of an inexhaustible supply of raw materials.
Research
Having a limited knowledge of the subject, its techniques and methods I did some research on the internet. While I found many superb images there was little reference to photographers working in this genre, and those that are tend to be commercial photographers producing advertising material for clients. One that stood out for me was Marcel Christ and I had a good look at his portfolio. The images are varied using coloured dye(s) and powders etc dropped into water. Backgrounds are mainly black or white so not competing with the subject.
I also needed to understand some of the basic skills. This was easier searching on “You Tube” videos where many educators demonstrate the different techniques. Some of the best in both presentation and explanation was published by Adorama, a New York photographic supplier publishing short videos on a variety of photographic subjects. “Paint Splash Photography” presented by Gavin Hoey demonstrates the art of anticipation very well and “Colour drop & pour photography technique” presented by Learn My Shot provided information on making pictures using a fish tank.
Techniques
The videos made taking these types of pictures relatively easy to understand and I was under no illusion that this project was going to take time and constant practice to achieve even a modicum of success.
- To freeze the action I would need to use flash photography. I am fortunate to have the use of two flash guns and I spent time getting to understand how they work with my camera as I rarely use flash. The camera and flash manuals where a good starting point and it became clear that the flash would have to be triggered in manual mode to obtain the best results and I would need to experiment with the heads in different positions to the subject. The videos suggested the use of 1/8 power at f8 to get a good depth of field and to freeze the action so I followed this set up almost throughout the assignment although I did experiment later on to see what effect the changes would make.
- Use of a tripod was necessary for the camera as I needed both hands free to press the shutter and drop objects at the same time.
- My set up was in the garage being the best space where I could leave it set up between sessions (15 in all) and make a mess. The garage was rather confined but with no ambient light I could control the subject lighting much easier.
- I would need to constantly evaluate the pictures as I was taking them to hone the skill necessary to synchronise the drop and triggering the camera at the right time. Using the tethered capture facility in Lightroom on my laptop was a real bonus here. The downside was having a cable to potentially trip over. I overcame this by using a 5 metre cable and hooking it to the ceiling out of the way. The flash guns were not a problem as I can fire them remotely.
- The pipet was taped to the copy stand. This allowed me to pre-focus the lens where I knew the drops etc would fall. I could pre-focus by dangling a metal washer from the pipet to the base of the copy stand
- Cleaning became a regular task to avoid as much post processing as possible.
The Outcome
Over the course of the assignment I had 15 sessions, each one building on knowledge gained from the previous session(s) and experimenting with different ideas. I started with the Paint Splash idea from the Gavin Hoey video and this proved to be a complete failure. All I ended up with was a globule of paint on the tile. The paint I used was from Tesco and designed for use by children. This at least taught me about the viscosity of the liquids I would need to work with. Warming it in the microwave helped but the coldness of the garage returned it to a thick state quite quickly. I experimented with water dropping it into various shaped containers using food colouring dyes to highlight the splashes. Milk has produced some interesting shapes and particularly when I introduced orange food dye the result was some interesting marbled effects. My final sessions concentrated on the fish tank of water and I had great fun dropping shells into the water creating interesting shapes with bubbles created as they hit the water surface as well as dropping coloured dye. I had replace the water many times as it soon became cloudy. Post processing consisted mainly of selecting the usable images, cropping and a lot of spotting to remove distracting droplets.
The Panel


Contact Sheets
In total I took 1135 shots while working on this project. The majority, as one can imagine, were complete blanks or poor exposures from slow recycling times on the flash guns. This I have edited down to 697 images to review and from this a further edit down to 137 and post edit production on the final 12 to make the panel.
contact-sheet-set-1
contact-sheet-set-2
contact-sheet-set-3
contact-sheet-set-4
contact-sheet-set-5
contact-sheet-set-6
contact-sheet-set-7
contact-sheet-set-8
contact-sheet-set-9
contact-sheet-set-10
contact-sheet-set-11
contact-sheet-set-12
contact-sheet-set-13
Review
I was very pleased with the results of my project and the knowledge/skill I have been able to accrue in a short period of time. Despite the many hours in a fairly cold garage, I have learnt a lot and I will develop this project further.
My plan is now to print and show the panel with the addition of a few more at our local club as well as adding them to my blog which I started at the end of last year. It will be interesting to see the reaction.
- To develop the project further will require both time and a lot of patience. There are no limits and the creative opportunities are endless.
- I will need to think about camera angles and backgrounds more. A lot of the images I have cropped out backgrounds. I will also need to use larger containers for the liquids. Most of my panel are quite tightly cropped to remove background.
- Lighting during the project proved to be a difficult. In a confined space the light bounces of walls, ceilings etc. so I will need to get some black out material to help control this.
- One noticeable area of concern was water quality. We live in a hard water area and lots of particles were floating in the water. I will need some filtration system to purify it thus avoiding a lot of spot removal in post production.
- I will need to hone my Photoshop skills. In post production I have found that some of the creative ideas I could work on to lift the basic images were not available to me, so this will be part of the next phase.
Equipment Used:
Canon 5D MkIII
Canon Macro Lens EF 100mm
Canon 580 EXII Speedlite
Tripod
Cable release
Copy stand
Basting pipet
Developing tray (to catch drips)
Assorted ceramic dishes
Fish tank
Food colouring
Assorted sea shells
White ceramic tiles
Children’s colour paints
Milk
Water.
